- ‹
-
Battle plan: Gorewyrms Armageddon
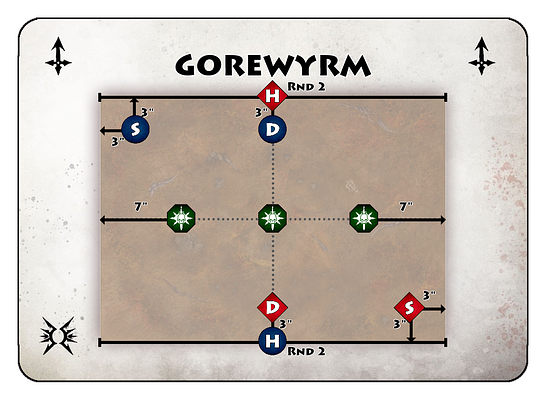
Before the battle, 3 objective markers are placed on the battlefield floor as shown on the deployment map.
Number them from 1-3 (1 - left, 2 - middle, 3 - right). The markers are treated as unscalable terrain.
At the start of battle round 1, the Gorewyrm emerges at objective marker 2.
The Gorewyrm is treated as an enemy fighter with a Toughness characteristic of 3 that is represented by the objective marker it most recently emerges from.
If a fighter makes an attack action that targets Gorewyrm and is more than 3” away, Gorewyrm is treated as “In Cover” and uses the "Take cover” reaction for the first attack action in that fighter’s activation.
Each player must keep track of the damage caused to the Gorewyrm by their fighters.
At the start of each battle round, the player with the fewest damage points allocated to Gorewyrm chooses whether the Gorewyrm moves left or right. In the case of a tie, the player without the initiative chooses.
After each activation in which the Gorewyrm suffers any damage, it immediately emerges from the next objective marker in the chosen direction (treat markers 1, 2 and 3 as forming a circle).
When the Gorewyrm emerges from a new objective marker, roll a separate dice for each fighter within 3" of that objective marker: allocate D6 damage to each of those fighters.
If a fighter has a Wounds characteristic of 12 or less, allocate D3 damage instead.
At the end of battle round 4, each player score 1 victory point for each 10 points of damage inflicted to the Gorewyrm, Player with the most victory points wins the battle.